
Developing a mobile application is a significant undertaking that requires careful planning, technical expertise, and strategic thinking. Whether you’re a first-time entrepreneur or an experienced developer, understanding the complete app development lifecycle is essential for creating a successful product. This comprehensive guide walks you through each phase of app development, from the initial concept to launching your application in the marketplace.
The app development process involves multiple interconnected stages, each building upon the previous one. Skipping or rushing through any phase can lead to costly problems later in development. By following this structured approach, you can minimize risks, optimize your resources, and create an application that meets user needs while achieving your business objectives.
Defining Your App Concept and Purpose
Every successful app begins with a clear, well-defined concept. Before writing a single line of code or designing any interface, you must thoroughly understand what problem your app solves and who it serves. This foundational work determines everything that follows in the development process.
Start by identifying a specific problem or need in the market. The most successful applications address genuine pain points that users experience regularly. Consider your own experiences and challenges—what apps do you wish existed? What processes in your daily life feel unnecessarily complicated? These observations often lead to valuable app concepts.
Next, define your target audience with precision. Instead of aiming for “everyone,” focus on a specific user persona. Consider demographics such as age, profession, technical comfort level, and typical device usage patterns. Understanding your users deeply allows you to make design and functionality decisions that resonate with their actual needs and preferences.
Document your app’s core value proposition in a single clear statement. This statement should explain what your app does, who it’s for, and why it’s better than existing alternatives. For example, rather than saying “a fitness app,” specify “a fitness app that helps busy professionals squeeze effective 15-minute workouts into their lunch breaks.” This clarity guides all subsequent decisions and helps maintain focus throughout development.
Conducting Market Research and Competitive Analysis
With a solid concept in place, the next critical step is validating your idea through market research. This phase reveals whether genuine demand exists for your app and identifies the competitive landscape you’ll enter.
Analyze existing applications in your intended category. Download and use your competitors’ apps personally, noting their strengths and weaknesses. Pay attention to user reviews in the App Store and Google Play stores—these reveal what users love, what frustrates them, and what features they’re requesting. Reviews from the past three to six months indicate current market expectations.
Identify your direct competitors (apps solving the same problem) and indirect competitors (apps serving the same audience with different solutions). Understand their pricing models, monetization strategies, and market positioning. This analysis helps you find your unique positioning and identify opportunities to differentiate your offering.
Research market size and growth trends using available industry reports. While specific figures vary by category, understanding whether your target market is growing, stable, or declining informs your business planning and investment decisions. The Pew Research Center regularly publishes data on smartphone and app usage patterns among Americans that can provide valuable context for various app categories.
Document your findings in a competitive analysis matrix. This document should list key competitors alongside their features, pricing, ratings, and notable gaps in their offerings. These gaps often represent opportunities for your app to differentiate and capture market share.
Creating the Design Specifications
With validation complete, you move into the design phase. This stage transforms your concept into concrete specifications that guide development. Effective design documentation prevents miscommunication and costly revisions later in the process.
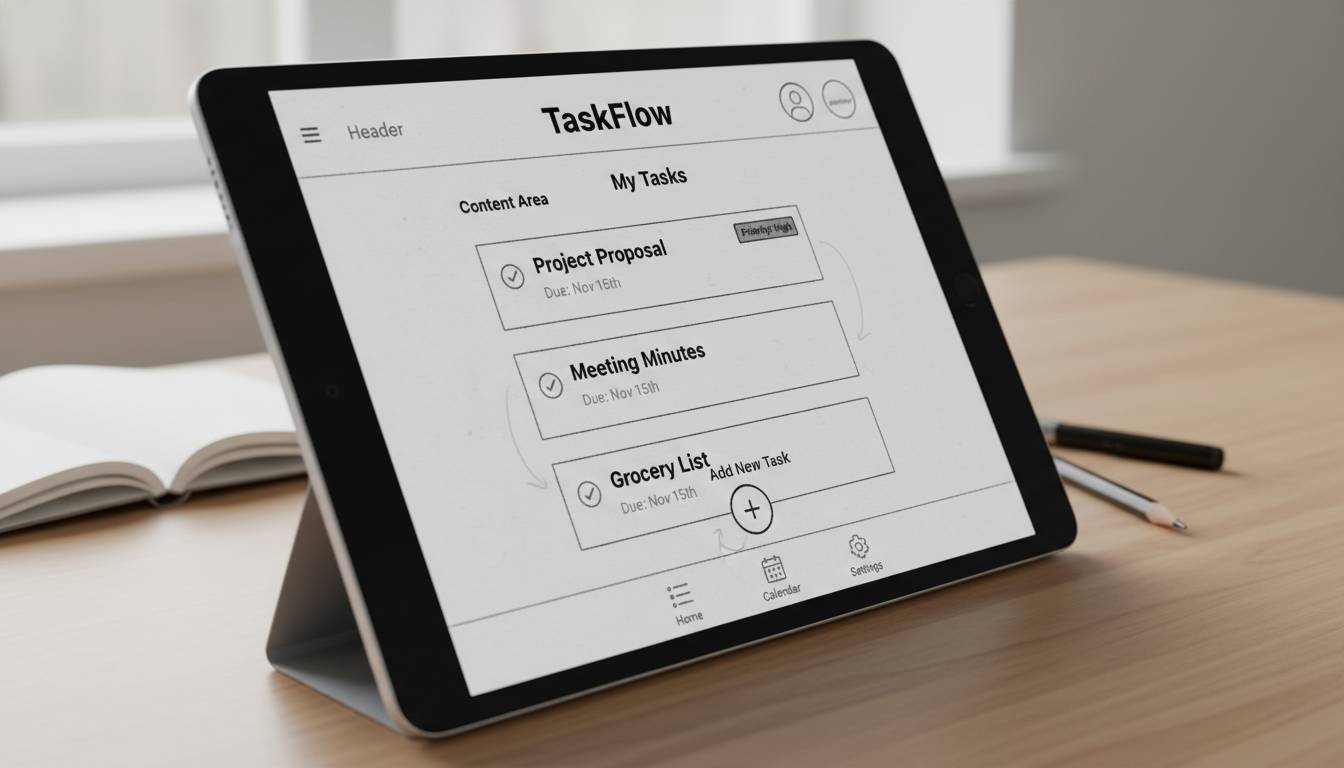
Begin by creating detailed user flow diagrams. Map every screen a user might encounter and show how they navigate between them. Consider all possible paths, including error states, empty states, and various user journeys through the application. These diagrams reveal complexity and help identify potential usability issues before any design work begins.
Develop wireframes for each screen type in your application. Wireframes are simple, black-and-white layouts that show where elements appear without detailed visual design. They focus on functionality and layout rather than aesthetics, allowing you to test navigation concepts and information hierarchy efficiently. Many developers create wireframes using tools like Figma, Balsamiq, or even pen and paper.
Create a comprehensive feature list, categorizing each feature as essential (must-have), important (should-have), or nice-to-have (could-have). This prioritization becomes critical when managing scope and budget. During development, you’ll inevitably face time constraints, and having this hierarchy allows you to make informed decisions about what to include in your initial release versus future updates.
Design your visual identity system, including color palette, typography, icon style, and overall aesthetic direction. This system ensures visual consistency throughout your application and across any marketing materials. If you lack design skills, consider using established design systems like Material Design (for Android and cross-platform) or Human Interface Guidelines (for iOS) as foundational frameworks.
Choosing Your Development Approach
One of the most consequential technical decisions you’ll make is selecting your development approach. The choice between native development, cross-platform development, and hybrid development significantly impacts your timeline, budget, and the user experience your app can deliver.
Native development involves building separate applications for iOS and Android using platform-specific programming languages and tools. Swift is used for iOS development, while Kotlin or Java serve Android development. Native apps typically offer the best performance, full access to device capabilities, and the most polished user experience. However, this approach requires maintaining two separate codebases, effectively doubling development time and costs.
Cross-platform development frameworks like React Native, Flutter, and Xamarin allow you to build for both platforms from a single codebase. Flutter, developed by Google, uses the Dart programming language and has gained significant popularity for its excellent performance and consistent rendering. React Native, maintained by Meta, uses JavaScript and allows developers to leverage existing web development skills. These frameworks significantly reduce development time and costs while still allowing access to most native features.
Progressive Web Apps (PWAs) represent another approach, creating web applications that function like native apps across all platforms. PWAs offer lower development costs and easier maintenance but cannot access all native device features and may not be accepted in all app stores.
Consider your specific requirements when making this decision. If maximum performance and platform-specific features are critical, native development may be necessary. If speed to market and budget constraints are primary concerns, cross-platform solutions often provide the best balance. Your target audience matters too—if your users predominantly use one platform, prioritizing that platform initially may be more cost-effective than building for both simultaneously.
Building the Minimum Viable Product
Development begins with building your minimum viable product (MVP). An MVP includes only the core features necessary to launch and begin gathering user feedback. This approach allows you to validate your assumptions quickly while managing development costs and timeline.
Establish your development environment and version control system from the start. Git, combined with a platform like GitHub or GitLab, provides essential tools for code management, collaboration, and backup. Configure continuous integration and deployment pipelines early to automate testing and release processes.
Follow clean architecture principles when structuring your code. Separate your business logic from your user interface and data layers. This organization improves maintainability, makes testing easier, and allows you to modify individual components without affecting others. Document your code thoroughly—future you will thank present you for clear, explanatory comments and documentation.
Implement analytics tracking from the beginning. Understanding how users actually interact with your app is essential for making informed iteration decisions. Services like Firebase, Mixpanel, or Amplitude provide comprehensive analytics capabilities. Track not just usage counts but specific user actions, navigation patterns, and conversion funnels relevant to your app’s goals.
Develop your backend infrastructure concurrently with your frontend development. If your app requires server-side functionality, design your API contracts early and ensure clear communication between your mobile and server teams. Cloud services like AWS, Google Cloud, or Firebase provide scalable infrastructure that grows with your user base.
Testing and Quality Assurance
Thorough testing is non-negotiable in app development. Users expect polished, bug-free experiences, and even small issues can damage your reputation and lead to negative reviews. A comprehensive testing strategy catches problems before they reach your users.
Conduct unit testing for individual functions and components throughout development. These tests verify that specific code segments work correctly in isolation. Most development frameworks include testing utilities—Flutter includes built-in testing capabilities, while React Native developers often use Jest. Aim for high test coverage on complex business logic and critical features.
Perform integration testing to verify that different parts of your application work together correctly. API calls, database operations, and cross-screen workflows all require integration testing to ensure smooth operation. These tests catch issues that unit testing might miss, such as mismatched data formats or timing problems.
Conduct user interface testing across multiple device types and screen sizes. Your app must function correctly on various iPhones, Android phones, and tablets. Test on physical devices when possible—emulators and simulators cannot replicate all real-world behaviors, particularly around touch response, sensor integration, and performance under stress.
Implement beta testing with real users before your full launch. Services like TestFlight (for iOS) and Google Play’s internal testing tracks allow you to distribute pre-release versions to external testers. Recruit beta testers who match your target user profile and gather their feedback systematically. This real-world testing often reveals usability issues that internal testing misses.
Preparing for App Store Submission
With testing complete, you prepare your app for submission to the Apple App Store and Google Play Store. Each platform has specific requirements and review processes that must be navigated carefully.
Create your developer accounts well before launch. Apple charges an annual fee of $99 for developer program membership, while Google charges a one-time $25 fee for developer account access. These accounts provide access to submission portals, analytics, and developer resources.
Prepare your app metadata, including your app name, description, keywords, and screenshots. Your app name should be memorable and include relevant search terms. Your description’s first few lines are particularly important—they appear in search results and store listings without users clicking to expand. Include screenshots showing your app’s key features and benefits, creating separate sets for phone and tablet if applicable.
Build your app for production release, ensuring all debugging features and test data are removed. Generate the required certificates and provisioning profiles for iOS, or configure your signing config for Android. Follow each platform’s specific build requirements precisely—small configuration errors can cause rejection.
Submit your app for review, understanding that review times vary. Apple’s review process typically takes 24-48 hours but can take longer for complex apps or during peak periods. Google Play’s review is generally faster, often completing within a few hours. Prepare for possible rejection by reviewing both platforms’ guidelines thoroughly and addressing any potential issues proactively.
Launching and Marketing Your App
Launch day is just the beginning of your app’s journey. Successful apps require ongoing attention to marketing, user acquisition, and engagement. A thoughtful launch strategy maximizes your visibility and builds momentum for long-term success.
Coordinate your app store presence with external marketing efforts. Announce your launch through press releases, social media, and relevant online communities. If you have an existing audience through a website, newsletter, or social media following, leverage these channels to drive initial downloads.
Implement an App Store Optimization (ASO) strategy to improve your visibility in search results. Research relevant keywords using tools like Sensor Tower, App Annie, or the platforms’ own search suggestion features. Optimize your title, keywords, and description for terms your target users actually search for. Monitor your rankings and adjust your strategy based on performance data.
Consider launch promotions or limited-time offers to drive initial downloads. Paid user acquisition through platforms like Apple Search Ads or Google Ads can jumpstart your presence while you’re building organic traction. Start with modest budgets and optimize based on your cost per install and user quality metrics.
Encourage users to leave reviews and ratings. Positive reviews significantly impact your app’s visibility and conversion rates. Prompt satisfied users to rate your app—iOS allows in-app rating prompts, while Android’s implementation varies. Respond professionally to all reviews, addressing concerns and thanking positive reviewers.
Maintaining and Updating Your App
Post-launch maintenance is essential for long-term success. Users expect continuous improvement, bug fixes, and new features. A solid maintenance strategy keeps your app relevant and maintains user satisfaction.
Monitor your app’s performance and crash reporting continuously. Services like Firebase Crashlytics, Sentry, or Bugsnag provide real-time alerts when issues occur. Address critical bugs promptly—users rarely give second chances to apps that lose their data or fail to function.
Plan regular updates that add value and address user feedback. Review app store comments regularly to identify common requests and pain points. Prioritize updates that address high-impact issues and implement frequently requested features. Maintain a consistent update cadence—monthly or bi-monthly releases signal active development and commitment to your users.
Keep your dependencies and SDKs current. Outdated libraries can cause compatibility issues and security vulnerabilities. Review your third-party integrations periodically and remove any that are no longer maintained or necessary.
Gather and analyze user feedback systematically. Build in-app feedback mechanisms that make it easy for users to report issues or suggest improvements. This feedback, combined with your analytics data, guides your product roadmap and ensures you’re building what users actually want.
Frequently Asked Questions
How long does it take to develop a mobile app?
The timeline varies significantly based on complexity, features, and development approach. A simple app with basic features might take two to four months using cross-platform tools. More complex applications with advanced functionality typically require six months to a year or more of development. Native apps requiring separate iOS and Android development will take longer than cross-platform solutions with equivalent features.
How much does it cost to develop an app?
Costs range widely based on complexity, development approach, and whether you hire external developers. Simple apps can cost $10,000 to $30,000, while complex applications with advanced features may cost $50,000 to $300,000 or more. Using cross-platform frameworks can reduce costs by 30-50% compared to native development. Ongoing maintenance typically costs 15-25% of initial development costs annually.
Do I need to learn programming to build an app?
No, several no-code and low-code platforms allow non-programmers to build functional apps. Buildfire, Glide, and Adalo enable basic app creation without coding knowledge. However, these platforms have limitations in customization and feature access. For professional, scalable applications with unique functionality, learning to code or hiring developers remains the standard approach.
Should I develop for iOS or Android first?
This depends on your target audience and business goals. Consider where your potential users are—iOS users tend to have higher spending power, while Android dominates global market share. If you’re building a consumer app for the US market, iOS often provides better revenue potential per user. If targeting international markets or price-sensitive users, Android may be preferable. Many successful apps eventually support both platforms.
How do I make money from my app?
Common monetization strategies include paid downloads (one-time purchase), freemium models (free with optional paid upgrades), subscription plans, in-app purchases, and advertising. The best model depends on your app type and user expectations. Games often use freemium with in-app purchases, while productivity apps frequently adopt subscription models. Some apps combine multiple approaches.
What happens if my app gets rejected from an app store?
App rejections happen frequently and are usually resolvable. Review the rejection reason carefully—the stores provide specific feedback about guideline violations. Address the issue directly, making necessary modifications to your app or its metadata. You can appeal rejections if you believe they were made in error. Most rejections can be resolved within a few days by making targeted corrections.


Leave a comment