
Measuring your room might sound like one of those simple tasks you do in a few minutes—and hey, maybe it is. But often? Things get messy. Maybe you forget the little alcove behind the door, or the rug throws off your perception of space. This often leads to awkward furniture fits or wasted trips returning ill-sized sofas. This step-by-step guide helps you avoid those classic mistakes—expect a bit of conversational meandering, imperfect acknowledgment of surprise twists, and a dash of real-world examples.
Why Measuring Matters Before You Shop
Whether you’re planning a cozy reading nook or refining an open-living area, dimensions matter. A couch that looks roomy in the showroom might overwhelm your space—or cliffs at an angle if you miss that slim clearance by half an inch. That’s right: half an inch! Beyond awkward placement, accurate measuring prevents wasted money, mounting frustration. Designers often attribute better room flow to thoughtful spatial planning, and many homeowners report smoother layouts when they measure properly beforehand.
Beyond this, furniture retailers sometimes offer virtual room planners that rely on accurate dimensions to preview configurations—this only works if your numbers are trustworthy.
Preparing to Measure: Tools and Mindset
Tools of the Trade
Before you begin, have on hand:
– A reliable tape measure (5m/16ft or longer)
– A notepad or sticky notes—something you’ll actually write on
– A pencil or pen—and maybe an eraser, because mistakes happen
– Optional but helpful: laser measure (if you can try one from a friend or DIY shop)
Getting the Right Mindset
Go through the room like a detective. Take your time, check quirky corners, factor in window depths, door swings, radiator protrusions. Don’t rush through because measuring feels tedious—it’s actually the groundwork for a smoother layout. Jot down any odd angles, sloped ceilings, or built-in shelves in your notes; you’ll thank yourself later.
Step-by-Step Measurement Guide
Sectioning the Room Smartly
Break the room into simple areas—thinking of the room as rectangles or L-shapes helps. For instance, in an L-shaped living area, take separate measurements: “Area A” and “Area B.” This avoids confusing figures later on.
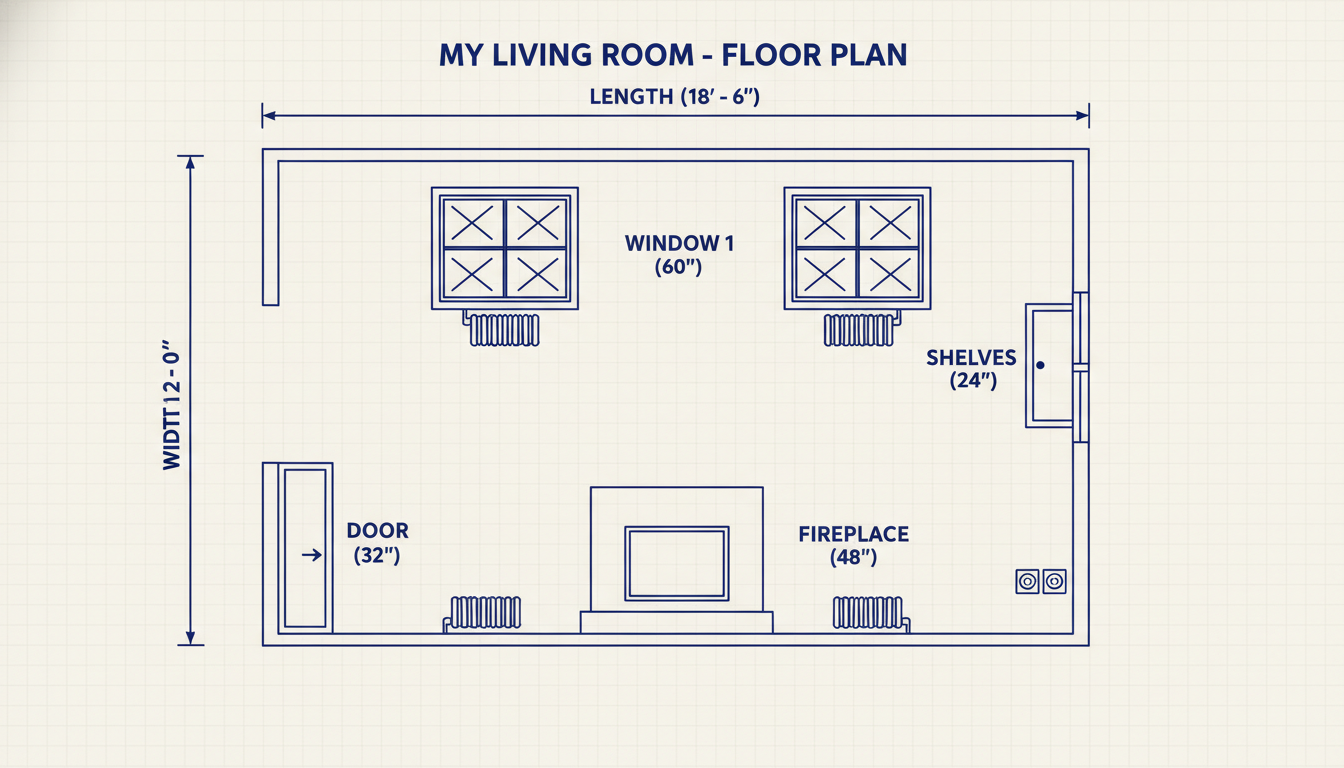
Step 1: Measure Overall Dimensions
Start by measuring total length and width. Measure wall to wall, not along furniture or other obstructions. Repeat on the opposite side to account for unlevel surfaces—rooms shift, houses settle, and things don’t always line up perfectly.
Step 2: Locate Doors, Windows, and Obstructions
Then, note door and window placements:
– Measure the distance from one corner to the edge of the window or door.
– Measure the width of the window/door.
– Measure from the other edge of that feature to the next corner.
This triangulation ensures furniture placement doesn’t clash with swings or block natural light.
Step 3: Add Depth—Heaters, Radiators, Built-ins
These often overlooked protrusions can cost precious inches. Measure their depth and clearance needed. Some heaters need several inches of airflow clearance—skip it at your peril.
Step 4: Height Matters—But With Caveats
Wall height is key if you’re planning tall furniture or wall fixtures. But if your ceilings are standard (8–9 feet), just noting it once may suffice unless there are drops or vaults.
Flow Summary of Steps
- Measure total room length and width.
- Note distances to doors/windows from corners.
- Measure widths of those openings.
- Include depths of protruding elements.
- Check wall height where relevant.
Common Pitfalls and Real-World Examples
A friend once bought an armchair that just missed the upstairs landing by an inch—drove half an hour back for returns. Another client laid out a media console to scale on the floor with painters’ tape—virtually “walked” around it to see how traffic flowed. That simple simulation saved them from a cramped layout disaster.
Most mis-measurement errors come from:
– Not accounting for door swing
– Skipping odd alcoves
– Relying on floor area without layering in vertical obstacles like built-ins
As one interior planner reflects:
“Even a minor misread—say, missing a radiator’s 3-inch projection—can throw off a whole layout. That’s why spacing accuracy matters as much horizontally as vertically.”
Visualizing Layouts With Measured Data
Sketching Your Room
Draw a rough, to-scale diagram on paper (1 square = 1 foot or similar). Label each measurement and mark openings and features. It doesn’t have to be perfect—just legible and logical.
Tape-and-Cardboard Techniques
This low-tech trick is surprisingly helpful: lay painter’s tape to mark the footprint of furniture on the floor, or cut cardboard to scale as a sofa or table stand-in. Suddenly you can “see” if that sizable sectional will dominate or fit just right between your windows.
Digital Tools and Online Planning
Many furniture sites now offer basic room-planning tools. You plug in your measurements, and the tool simulates placement. It isn’t flawless, but it’s better than nothing. If you’re uncertain, try multiple tools—consensus across them increases your confidence.
Tips for Difficult Spaces: Odd Shapes and Multi-Functional Areas
Algorithmic measuring seldom covers weird floor plans. Vaulted ceilings, half-walls, mezzanines? Use multiple vantage points:
– Measure from several reference points
– Note transitions in floor levels or ceiling slopes
– Photograph irregular angles and sketch them
For multi-functional zones—like a combined dining and living area—section your notes accordingly. Label areas “Living A” and “Dining B,” each with separate dimensions. That way your table doesn’t block foot traffic between zones.
Sustainability and ROI
Measuring smartly isn’t just aesthetics—it dovetails with sustainability: ordering the right size furniture avoids returns, packaging waste, and carbon-intensive transports. One small logistics firm reported reduced return rates when clients used pre-purchase measurement tools. So, that little extra effort may well pay environmental and financial dividends.
Conclusion
Taking the time to measure your room thoroughly—accounting for length, width, doors, windows, protrusions, height—isn’t glamorous, but it’s fundamental. A well-measured space avoids surprises, fits furniture perfectly, and even reduces waste. So measure like a detective, sketch with purpose, and simulate where you can. You’ll save time, money, and headaches—and you may discover your room had more potential than you realized.
FAQs
How accurate do measurements need to be?
Aim for within a centimeter or half an inch of precision. Minor errors add up quickly, especially in tight spaces where even a few inches can disrupt furniture fit.
Should I measure door swings?
Absolutely. Note the path doors take when opening to ensure your furniture doesn’t block traffic or get dinged.
What’s a good way to visualize furniture before buying?
Low-tech tricks like painter’s tape on the floor or cardboard stand-ins work well. Digital room planners offer faster, though sometimes less accurate, alternatives.
Do I need to measure ceiling height?
Only if you’re planning tall shelves, wardrobes, or hanging fixtures. Standard ceiling heights often require only a single note, unless unusual features exist.
Can online room-planning tools be trusted?
They’re useful but imperfect. Input your real measurements and use the planner as a visual guide—not the sole decision-maker.


Leave a comment