You have been on vacation in New York and upon your return you realize that accidentally from the memory card of your camera, the only photograph that you had taken by a random Japanese tourist against the background of the Brooklyn bridge Manhattan with skyscrapers was deleted. Only the one you had taken is left in which therefore you do not appear.
Maybe you had already anticipated a prominent print to put in your living room to be shown to friends and relatives when they came to visit you.
There are two solutions to rectify this issue:
1. Buy a plane ticket and return to New York to have a new photo taken by another Japanese tourist
2. Resort to Adobe Photoshop (and possibly to someone who knows how to use it well) and make a photomontage.
The first solution is decidedly expensive both in terms of money and time to recover a deleted photo, the second one is much cheaper, the only problem is that if you don’t know how to use Photoshop well you have to find who is able to perform the photomontage so that you do not give the slightest suspicion that it is a photomontage and that it looks like an original photograph in all respects.
Create an “unexpected” photomontage
In this article It will explained, taking as a reference the above case and without going into boring technical explanations, what are the basic ingredients to create a realistic photomontage that can be mistaken for an untouched photograph, not those artistic or surreal photomontages that, however much well done, it is known that they must be the result of digital manipulations, for example image 2 is plausible that it is the result of a photomontage.
Choice of the photo
The first step is to choose a compatible photo that already exists or, if necessary, to take one specifically that is suitable for photomontage. The photo in question to choose, or to be taken, must satisfy some compatibility parameters:
1. the two photos must have roughly the usual perspective
2. the light and shadows must have more or less the same direction
3. the posture of the subject must be appropriate to where you want to insert it
4. if the photos are in external, the shooting time, the time of year and the climatic conditions of the two photos are also important, the more they are similar and the better it is and they also relate to the compatibility of light and shadows.
5. as far as it concerns the more technical aspect, the resolution and the quality of the two photos is better that they are not excessively different
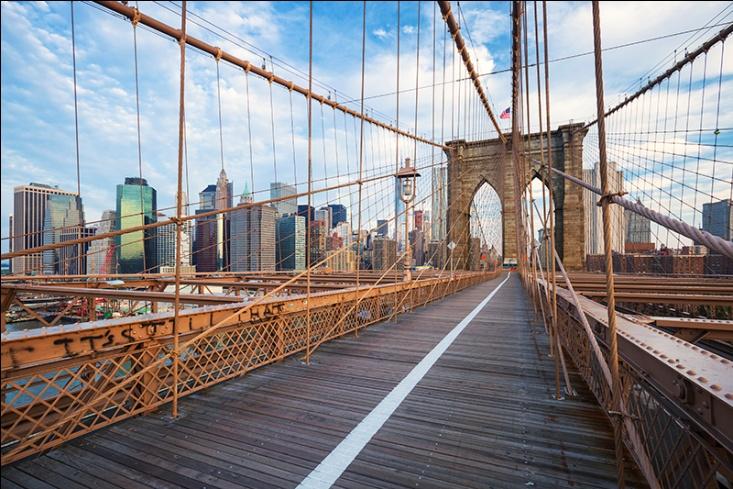
As for the perspective and posture of the subject are compatible with the photo of image 1 (there is also a bridge railing), however light, shadows and climatic conditions cannot be reconciled: if we cut the figure in the photo above and we leaned against it ‘other sunny direction, as well done as the photomontage, the lack of direct sunlight on the figure would raise some suspicions. So, this photo is not good for photomontage.
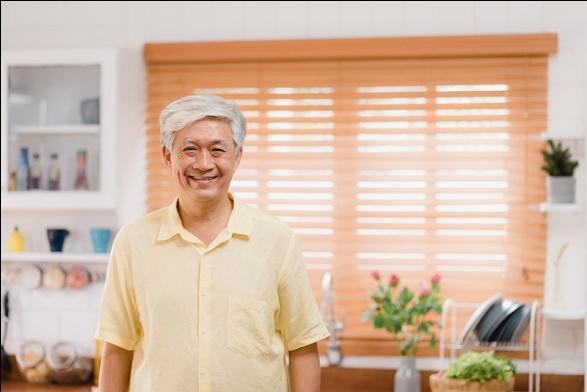
The perspective is roughly the usual, the posture is compatible (also leaning against a railing), the weather conditions are fine this time, lights and shadows may be fine (except for a detail that I will say later) and resolution and quality I’m fine. So, this photo is a good candidate to be used for photomontage.
As mentioned, however, there is an inconsistency in the direction of the light, in fact in the photo of the background to be used (image 1) the direction of the light is from right to left while in that of the subject to be added (image 2) goes from left to right.
In fact, as shown in image, if you look at the facades of the buildings in the background, those facing right are illuminated while those facing left are shaded, the shadows are on the right and the parts lit on the left. This inconsistency can be avoided by horizontally reflecting the photograph of the subject.
Outline and positioning of the figure
One of the main components for the success of the photomontage lies in making an adequate and flawless outline of the figure.
Preliminarily it is necessary to perform an approximate outline of the figure. Once the contouring is done, the cropped figure is inserted in the photo, it is positioned at the desired point and the proportions are adjusted, the result looks like in image 3.
I suppose it is evident also to the less expert of photomontage that, as it is, the figure is not well inserted in the photo. Leaving aside the fact that the arm is not (yet) resting on the parapet, the other inconsistency factors are:
1. rough outline
2. different shades and brightness
3. lack of shadows cast by the figure
These three points will be remedied starting with finishing the edges. The figure must be suitably finished and outlined on the edges in order to “mix” it with the new environment. Halos, too defined and squared outlines that reveal a clumsy photomontage should be avoided. We see a comparison between before and after the perfection of the cut.
The difference is particularly evident on the edge of the hair and on the left ear where, before finishing, the presence of a halo that does not make the figure perfectly integrated with the background is visible. The figure on the right, in which the outline of the edges has been suitably finished, is well inserted on the new background. In these cases, particular attention must be paid to the trimming of minute details such as hair that are of particular difficulty.
Adjustment of the arm posture
From image1 it can be seen that the arm on the right must be lowered so that it rests on the parapet, only the arm must be rotated downwards keeping the rest of the body in position and maintaining an inclination of the hand such that it adapts to the handrail.
Hue and brightness correction
As already mentioned, the figure is too dark and has a general shade not compatible with that of the photo in which it is inserted. After making the relevant corrections, the result is that of image 3, where the comparison between before and after is reported.
Added cast shadows
To make the photomontage realistic, the shadows cast by the figure on the floor and on the railing must still be added. we can see the difference between before and after adding the shadow in the figure.
It is clear how the addition of shadows is necessary for the success of the photomontage.
Adding fluff on the edges
During the contouring phase of the figure, the faint hair on the edges of the arms, legs and neck was cut off as including it would be practically impossible without obtaining poor results. The visibility of the fluff is appreciable only at a 100% enlargement of the photo; however, its re-addition is part of that attention to the smallest details that make the montage credible. Image 3 shows the comparison of the detail at the arm during various stages of the photomontage.
On the left we see the detail of the original photo in which the down is visible on the edge of the arm. The central image represents the detail of the photomontage with the contoured figure excluding the hair, it is clear that the edges cannot remain so “smooth” because in any case the hair can be seen on the arm and moreover they are clearly visible on the inner edge of the arm which it overlaps the shirt just above the clock, which is the part not affected by the outline. The solution at this point is to arm yourself with patience and draw the missing hair on the edges directly with the brush tool. The final result is visible in the single image on the right in the areas indicated by the white arrows.
Adjustment of inconsistent elements resulting from reflection
As you will remember, to overcome the opposite direction of light in the two photos used for the photomontage, it was decided to reflect the human figure horizontally. This procedure can be performed because the human body is generally symmetrical and in this particular case the task is simplified by the fact that there are no elements such as tattoos or writings on the shirt that would make the figure asymmetrical. With reflection, however, there are two factors that are inconsistent: the watch would go from the left arm to the right arm (the guy in the photo in question when he wears the watch always wears it on the left wrist) and the fabric flap of the trouser zipper would have the opening on the left and not on the right as it should be. The simplest solution for the watch is to make it disappear, while the fabric flap of the zipper must be reflected horizontally again. Image 3 shows the results of the two operations with the comparison before and after.
As mentioned, and as you can see, the watch has been removed from the wrist and the fabric flap of the zipper has been retouched so that the opening is on the right.
Final photomontage

Conclusion
In conclusion, to create a realistic photomontage(image editing service) in a workmanlike manner it is necessary to pay attention to the smallest details in all phases of the work, starting from the choice of photos with which to make the photomontage, going from the outline and finishing to the finishing of the details.