
Creating a crypto wallet is your first step into the world of cryptocurrency ownership. Unlike keeping money in a traditional bank account, a crypto wallet gives you full control over your digital assets—no middlemen, no approval processes, just you and your funds. Whether you want to store Bitcoin, Ethereum, or any other cryptocurrency, setting up a wallet is straightforward once you understand the options available.
This guide walks you through creating a crypto wallet in five simple steps, explaining each option so you can choose the right type for your needs. We’ll cover everything from software wallets for beginners to hardware wallets for maximum security.
Understanding Crypto Wallet Types Before You Start
Before creating your wallet, you need to understand the two main categories: hot wallets and cold wallets. This choice affects your security level and convenience.
Hot wallets connect to the internet and include mobile apps, desktop software, and web-based exchanges. They’re convenient for frequent transactions but carry more security risk since they’re always online. Examples include Coinbase Wallet, MetaMask, and Trust Wallet.
Cold wallets store your cryptocurrency offline. Hardware wallets like Ledger and Trezor devices fit this category. They’re ideal for holding large amounts you don’t plan to move frequently.
A third category worth mentioning is custodial wallets, where a company holds your private keys for you. Exchange wallets (like those on Coinbase or Binance) fall here. While convenient, you don’t truly own your crypto—you’re trusting the exchange to keep it safe.
For most beginners, starting with a reputable hot wallet from a major exchange provides the best balance of ease and security. As your holdings grow, you can migrate to a hardware wallet for enhanced protection.
Step 1: Choose the Right Wallet for Your Needs
Selecting your wallet type depends on several factors: how much crypto you plan to hold, how often you’ll transact, and your comfort with technology.
Software Wallets (Hot Wallets)
Software wallets are free to download and easy to use. Mobile wallets like Coinbase Wallet (available on iOS and Android) and Trust Wallet allow you to manage your crypto from your smartphone. Desktop wallets like Electrum for Bitcoin or Exodus run on your computer.
Web wallets through exchanges like Coinbase, Kraken, or Gemini offer the simplest onboarding. You create an account, complete identity verification, and can buy crypto immediately.
Hardware Wallets (Cold Storage)
If you’re storing significant value, hardware wallets provide superior security. The Ledger Nano X (approximately $149) and Trezor Model T (approximately $219) are industry leaders. These devices store your private keys offline, protecting them from hacking attempts.
Key Consideration
Never choose a wallet based solely on promotional offers or unfamiliar names. Stick to established brands with proven track records. Research wallet reviews, check community forums like Reddit, and verify the wallet’s history of security incidents.
Step 2: Download or Purchase Your Chosen Wallet
Once you’ve selected your wallet type, the next step is obtaining the software or hardware.
Downloading Software Wallets
For mobile wallets, download the app directly from the Apple App Store or Google Play Store. Always verify the developer’s name matches the official company—for example, Coinbase Wallet should show “Coinbase Wallet” as the developer.
For desktop wallets, visit the official website directly. For instance, Electrum’s website is electrum.org, and MetaMask can be downloaded at metamask.io. Bookmark these sites to avoid phishing scams from similar-looking URLs.
Setting Up a Web/Exchange Wallet
Creating an account on a cryptocurrency exchange follows this process:
- Visit the exchange’s official website (not through search results—type the URL directly)
- Click “Sign Up” or “Create Account”
- Enter your email address and create a strong password
- Complete identity verification (KYC—Know Your Customer)
- Enable two-factor authentication (2FA)
This verification process can take anywhere from a few minutes to several days, depending on the exchange and verification volume.
Purchasing a Hardware Wallet
Buy hardware wallets directly from the manufacturer or authorized resellers. Order from Ledger.com or Trezor.io to ensure you’re getting an authentic device. Avoid purchasing used hardware wallets—you can’t verify they haven’t been tampered with.
When your hardware wallet arrives, verify the packaging is sealed and check for any signs of tampering before opening.
Step 3: Set Up Your Wallet and Secure Your Private Keys
This step is crucial. Your private keys are what grant access to your cryptocurrency—if someone obtains them, they can take your funds. No legitimate company or person should ever ask for your private keys.
Creating a Software Wallet
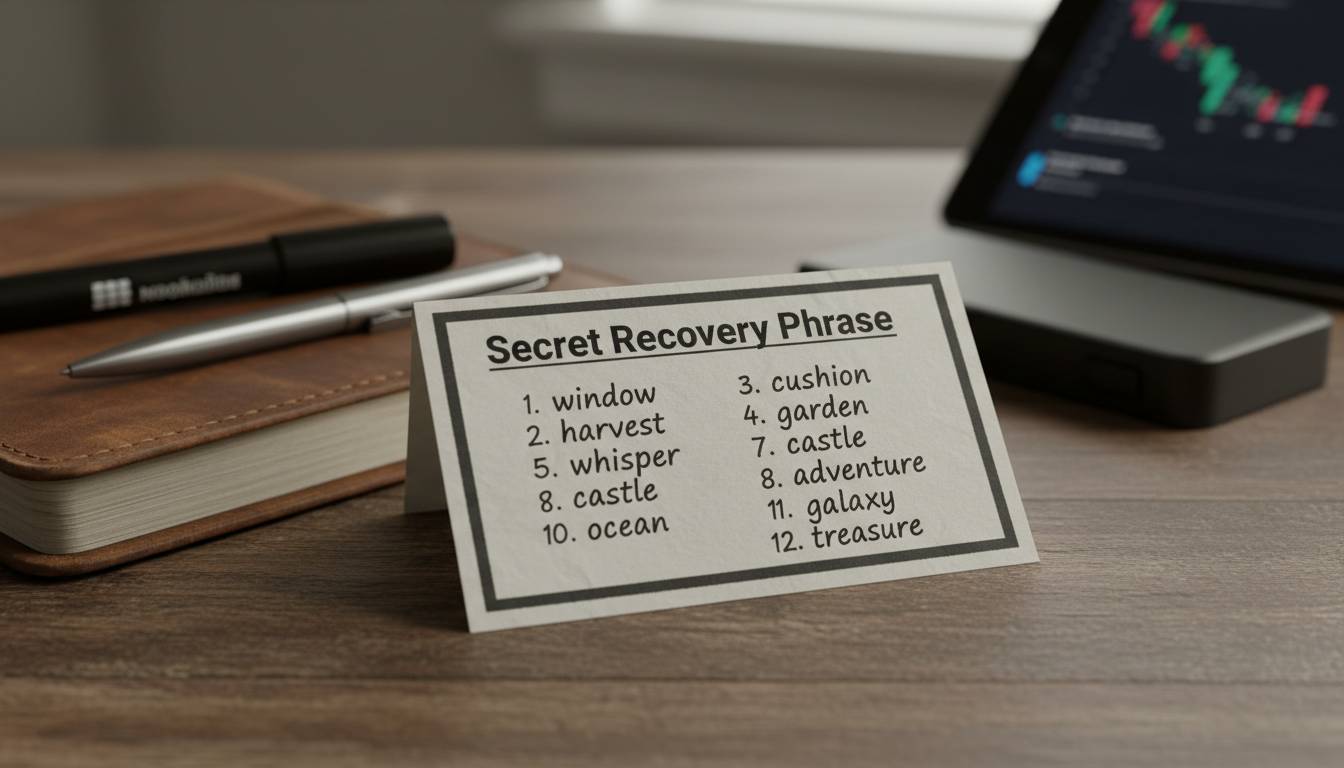
When you first open your wallet app, you’ll be prompted to create a new wallet. The app will generate a recovery phrase (also called a seed phrase or mnemonic phrase)—typically 12 or 24 words.
Write down your recovery phrase on paper. Do not store it digitally. Take these steps:
- Use the paper template provided by your wallet (or write on blank paper)
- Write each word in order—number them if helpful
- Make at least two copies stored in separate secure locations
- Store them somewhere waterproof and fire-resistant if possible
This recovery phrase is your wallet’s master key. If you lose your phone or computer, you can restore your wallet using this phrase on a new device. Anyone who has this phrase can access your funds.
Setting Up a Hardware Wallet
Hardware wallets add an extra layer of security. The device generates your private keys internally—they never leave the device.
- Connect your hardware wallet to your computer or phone
- Follow the on-screen setup instructions
- Create a PIN code (usually 4-8 digits)
- Write down your recovery phrase following the same rules as software wallets
- Verify your recovery phrase by entering specific words when prompted
Hardware wallets require you to confirm transactions physically on the device, preventing unauthorized transfers even if your computer is compromised.
Step 4: Add Cryptocurrency to Your Wallet
Now your wallet exists but is empty. You need to add funds.
Buying Crypto Within an Exchange Wallet
If you created an account on Coinbase, Kraken, or another exchange, you can buy crypto directly:
- Link your bank account or debit card
- Navigate to the “Buy” section
- select your desired cryptocurrency (Bitcoin, Ethereum, etc.)
- Enter the amount you want to purchase
- Review the transaction including fees
- Confirm the purchase
The crypto will appear in your exchange wallet immediately. For better security, transfer it to your personal wallet (software or hardware) rather than leaving it on the exchange.
Transferring Crypto to Your Personal Wallet
To move crypto from an exchange to your personal wallet:
- Open your personal wallet and find your receive address
- On the exchange, select “Withdraw” or “Send”
- Paste your wallet address carefully—cryptocurrency transactions cannot be reversed
- Double-check every character of the address
- Confirm the transaction
Transaction times vary by cryptocurrency. Bitcoin transfers can take 10 minutes to over an hour during busy periods. Ethereum transfers typically complete faster.
Sending Crypto Between Wallets
If you already hold crypto in another wallet and want to consolidate:
- Open your new wallet and copy the receive address
- Open your old wallet and select “Send”
- Paste the new address and enter the amount
- Review the network fee (this goes to miners, not the wallet service)
- Confirm and wait for confirmation
Step 5: Practice Security Best Practices
Creating the wallet is only the beginning. Protecting it requires ongoing attention.
Essential Security Measures
Enable two-factor authentication (2FA) on every account that supports it. Use an authenticator app (like Google Authenticator or Authy) rather than SMS, since phone numbers can be hijacked through SIM swapping attacks.
Never share your private keys or recovery phrase. No legitimate customer support person will ever ask for this information. Be wary of anyone claiming to be from a wallet company and requesting this data.
Use a strong, unique password for your wallet and exchange accounts. Consider using a password manager to generate and store complex passwords.
Keep your software updated. Wallet developers release updates to patch security vulnerabilities. Running outdated software leaves you exposed.
Long-Term Storage Strategy
For cryptocurrency you plan to hold for years, consider these additional measures:
- Hardware wallet for cold storage: Keeps keys offline
- Multiple recovery phrase copies: Store in secure locations (safe deposit box, trusted family member)
- Inheritance planning: Ensure a trusted person knows how to access your crypto if something happens to you
Warning Signs of Scams
Watch out for these red flags:
- Unsolicited messages about “account problems” or “verify your wallet”
- Requests to send cryptocurrency to “resolve issues”
- Promises of guaranteed returns or free crypto
- Downloads from unknown sources
- Public WiFi when accessing wallets
Frequently Asked Questions
What is the best crypto wallet for beginners?
For beginners, Coinbase Wallet or Kraken offer the easiest onboarding. They combine a simple interface with the ability to buy crypto directly using traditional payment methods. You can start with a small amount to learn the process before transferring larger sums.
Are crypto wallets free?
Software wallets and exchange wallets are generally free to create and use. Hardware wallets cost between $50-$300 depending on features. All wallets may have network fees when sending transactions—these go to the blockchain network, not the wallet developer.
Can I have multiple crypto wallets?
Yes, you can create and use multiple wallets. Many experienced users maintain several: a hardware wallet for long-term storage, a software wallet for everyday transactions, and potentially an exchange wallet for trading. This practice, called “wallet segmentation,” improves security by not keeping all funds in one place.
What happens if I lose my recovery phrase?
If you lose your recovery phrase and your wallet is destroyed or corrupted, your cryptocurrency is permanently inaccessible. There is no password reset for cryptocurrency—there is no central authority that can recover your funds. This is why writing down your recovery phrase and storing it securely is essential.
Is it safer to keep crypto on an exchange or in a personal wallet?
Personal wallets (especially hardware wallets) are safer for long-term storage because you control the private keys. Exchange wallets are more convenient for buying and selling but expose you to exchange-specific risks like hacks or account freezes. A common strategy uses both: keep trading funds on exchanges and store long-term holdings in your personal wallet.
How do I know my wallet address is correct?
Your wallet address is a string of letters and numbers (for Bitcoin) or starts with “0x” followed by letters and numbers (for Ethereum). Always copy and paste the address rather than typing it manually. After pasting, verify the first few and last few characters match before sending. Sending crypto to the wrong address means permanent loss.
Conclusion
Creating a crypto wallet opens the door to decentralized finance, giving you complete ownership of your digital assets. The five-step process—choosing your wallet, downloading or purchasing it, setting it up with proper security, adding funds, and following ongoing security practices—provides a foundation for safe cryptocurrency management.
Start with a reputable software wallet if you’re new to crypto. As you become more comfortable and your holdings grow, consider adding a hardware wallet for enhanced security. Remember: your recovery phrase is your ultimate backup. Write it down, keep it safe, and never share it with anyone.
The cryptocurrency space offers unprecedented financial freedom, but that freedom comes with responsibility. By following these steps and staying vigilant about security, you can confidently participate in the digital economy while protecting your assets.


Leave a comment