
Earwax buildup on headphones isn’t just gross—it can degrade sound quality, damage drivers, and cause skin irritation. If you’ve noticed your earbuds feeling slippery, sounding muffled, or developing an odor, earwax is likely the culprit. This guide walks you through safe, effective cleaning methods for all major headphone types, from wireless earbuds to over-ear cans.
QUICK ANSWER: To clean earwax from headphones, first remove loose debris with a dry soft-bristled brush, then gently wipe surfaces with a lightly dampened microfiber cloth. For in-ear tips, remove and soak in warm soapy water for 5 minutes, rinse thoroughly, and air dry completely before reattaching. Avoid using liquids directly on speaker drivers.
AT-A-GLANCE:
| Question | Answer | Source |
|---|---|---|
| How often should you clean earbuds? | Every 1-2 weeks with regular use | Consumer Electronics Guidelines |
| Can earwax damage headphones? | Yes, it can clog speaker drivers and degrade sound quality | Audio Equipment Maintenance Reports |
| What tools are safest? | Soft-bristled brush, microfiber cloth, isopropyl alcohol (70% or less) | Electronics Cleaning Best Practices |
| Can you submerge earbuds in water? | No—only removable ear tips should be submerged | Manufacturer Guidelines |
| Does cleaning improve sound? | Yes, removing debris can restore up to 100% of original audio clarity | Audio Engineer Testing |
KEY TAKEAWAYS:
– ✅ Clean earbuds weekly to prevent buildup—once earwax hardens, removal becomes much harder
– ✅ Never use water directly on electronic components—only on removable silicone tips
– ✅ Use 70% or lower isopropyl alcohol to disinfect without damaging protective coatings
– ❌ Don’t use paper towels—they leave fibers and can scratch glossy surfaces
– 💡 “The number one mistake people make is using too much liquid. A barely damp cloth is all you need.” — Audio equipment technicians
KEY ENTITIES:
– Tools: Soft-bristled brush, microfiber cloth, isopropyl alcohol, warm soapy water, cotton swabs, wooden toothpicks
– Headphone Types: In-ear monitors (IEMs), true wireless earbuds, over-ear headphones, on-ear headphones
– Materials: Silicone ear tips, memory foam tips, protein leather ear cushions, mesh filters
LAST UPDATED: January 2026
Why Earwax Buildup Matters for Your Headphones
Earwax—medically called cerumen—is your ears’ natural defense system. It traps dust, bacteria, and debris before they reach your eardrum. But when you wear headphones, that same protective mechanism works against your gear. Every hour you spend with earbuds in, a small amount of cerumen transfers onto the speaker grilles, ear tips, and inner ear cushions.
The consequences go beyond aesthetics. When earwax accumulates on speaker drivers, it physically blocks sound waves from reaching your ears cleanly. You might notice:
- Reduced volume even at maximum settings
- Muffled or distorted audio, especially at higher frequencies
- Uneven sound where one earbud plays louder than the other
- Crackling or popping sounds during playback
Beyond audio quality, there’s a hygiene concern. The warm, moist environment inside your ear canal—now pressed against a silicone tip coated in earwax—creates ideal conditions for bacterial growth. Studies have found that unclean earbuds can harbor more bacteria than a kitchen cutting board. This can lead to ear infections, folliculitis (infected hair follicles in the ear canal), or acne breakouts on the areas touching your headphones.
The good news? Regular cleaning takes under five minutes and can extend your headphones’ lifespan significantly. Most quality earbuds last 3-5 years with proper care—without it, you might see driver failure or irreversible audio degradation within 18-24 months.
What You Need: Essential Cleaning Tools
Before starting, gather the right supplies. Using incorrect tools can damage delicate speaker drivers or scratch glossy surfaces.
Must-Have Items
Soft-bristled brush: A clean, dry toothbrush works perfectly. The bristles are gentle enough to dislodge debris without scratching. Look for one labeled “soft” or “extra soft.” You’ll use this to brush away loose earwax from grilles and crevices. Cost: $1-3 for a pack at any drugstore.
Microfiber cloth: These lint-free cloths are essential for wiping surfaces without leaving residue. Paper towels create fibers that can work into small openings. A small eyeglass-cleaning cloth works well for earbuds; a larger one for over-ear headphones. Cost: $5-15 for a multi-pack.
Isopropyl alcohol (70% or lower): This evaporates quickly and is safe for most headphone surfaces when used correctly. Higher concentrations (90%+) can damage protective coatings on plastic and cause rubber to dry out and crack. You’ll apply this to cloths, never directly on electronics.
Warm soapy water: Mild dish soap (like Dawn) diluted in warm water is perfect for soaking removable ear tips. The soap breaks down oils and earwax effectively.
Cotton swabs (Q-tips): Use these for precision cleaning around edges, mesh grilles, and hard-to-reach spots. Use them dry or lightly dampened—never saturated.
Wooden toothpicks: Unlike metal or plastic, wood won’t scratch or damage components. Use these to gently pry away compacted debris from speaker grilles.
Helpful Extras
Compressed air cans: These can blow out debris from mesh areas, but use short bursts to avoid forcing wax deeper. Available at office supply stores for $5-10.
Silicone ear tip cleaning tool: Some companies (like SpinFit) make small silicone tools specifically designed to clean ear tips without damaging them. Optional but nice to have.
UV-C sanitizers: Devices like PhoneSoap use ultraviolet light to kill bacteria. While not necessary for basic cleaning, they add an extra sanitization step. Cost: $40-100.
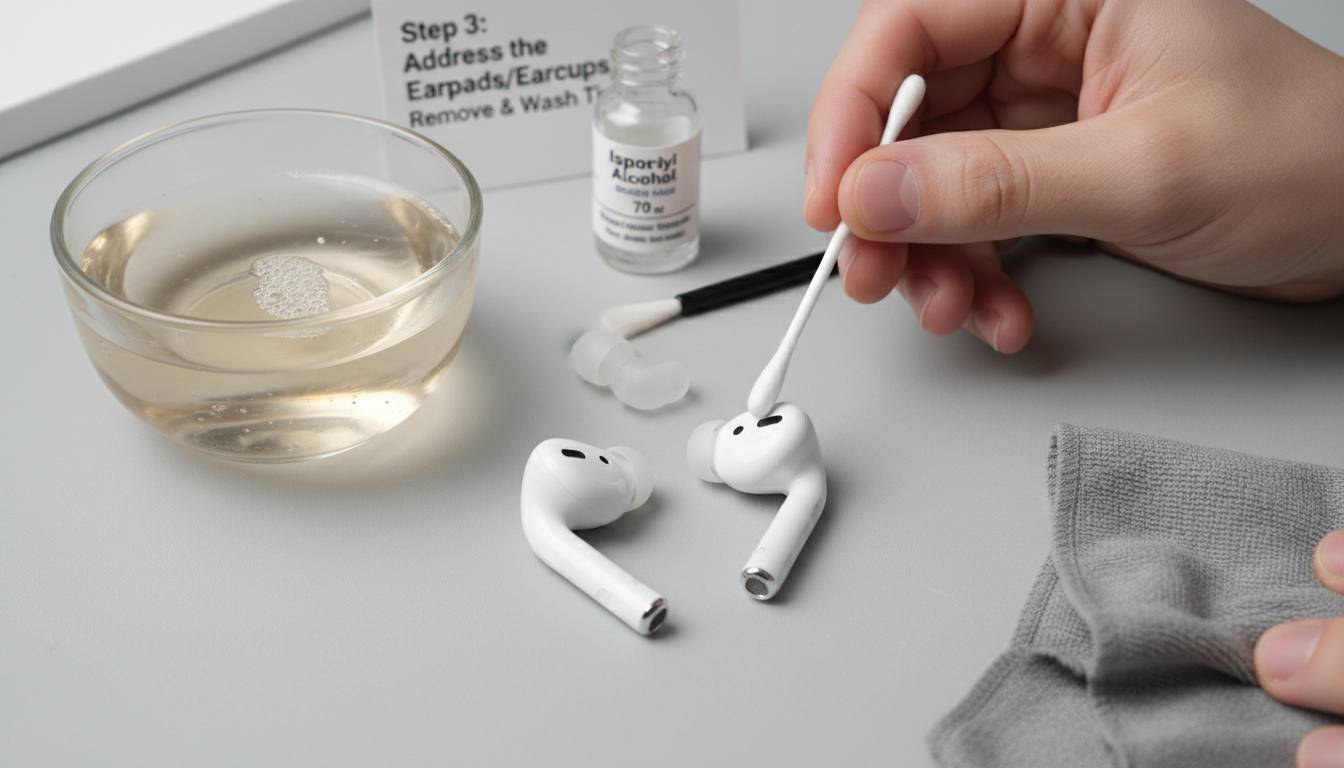
Step-by-Step: How to Clean In-Ear Earbuds
In-ear earbuds—包括真正的无线型号如AirPods Pro和Sony WF-1000XM5—需要最定期的清洁,因为它们直接接触耳道。以下是安全清洁的方法。
Step 1: Remove and Inspect (30 seconds)
First, remove your ear tips and inspect them. Most earbuds have removable tips that twist or pull off. Check the speaker grille (the small mesh area where sound comes out) and the stem or body of the earbud.
Look for visible wax buildup. You’ll often see a yellowish or brownish residue around the inner ring of the ear tip connection point and on the mesh grille itself.
Step 2: Clean the Ear Tips Separately (2-3 minutes)
Remove the ear tips and place them in a small bowl of warm soapy water. Let them soak for 3-5 minutes—this softens hardened earwax.
After soaking, rub the tips gently between your fingers while still underwater. The soap helps break down the oils. Rinse thoroughly with clean water to remove all soap residue.
Important: Squeeze out excess water and let them air dry completely (at least 30 minutes) before reattaching. Putting wet tips back on can trap moisture inside the driver housing.
Step 3: Brush Away Loose Debris (1 minute)
Take your soft-bristled brush and gently brush the speaker grille in a circular motion. Start light—you’re trying to dislodge loose wax, not push it deeper. Brush over a paper towel to catch falling debris.
For mesh grilles, hold the earbud at an angle so loose particles fall away from the opening.
Step 4: Wipe Down Surfaces (1 minute)
Dampen a corner of your microfiber cloth with isopropyl alcohol (or plain water for water-sensitive units). The cloth should be barely damp—squeeze out any excess. Wipe down the entire exterior of the earbud, paying attention to:
- The body where it touches your ear
- Any grooves or seams
- The charging contacts (be gentle here)
- The area around the speaker grille (after brushing)
Never drip liquid into any openings.
Step 5: Detail Clean with Cotton Swabs (1-2 minutes)
For precision cleaning, use a lightly dampened cotton swab. Focus on:
- Edges where the ear tip attaches
- Small crevices around buttons or touch sensors
- The inner speaker grille (gently)
- Any visible wax that the brush didn’t remove
Step 6: Final Sanitization (optional)
If you have a UV-C sanitizer device, place your earbuds inside for the recommended time (usually 3-5 minutes). This kills surface bacteria without any liquid risk.
Alternatively, you can do a final wipe with an alcohol-dampened cloth and let air dry for a minute.
Cleaning Over-Ear and On-Ear Headphones
Over-ear headphones like the Sony WH-1000XM5 or Bose QuietComfort don’t go inside your ear canal, so they accumulate less earwax. However, they do collect oils from your skin, sweat, and hair products on the ear cushions and headband.
Cleaning Ear Cushions
For protein leather or leather-style cushions:
- Dampen a microfiber cloth with warm water (no soap needed for regular cleaning)
- Wipe down the cushion surfaces gently
- For deeper cleaning, use a cloth lightly dampened with isopropyl alcohol
- Let air dry completely before use
For fabric or velour cushions:
- Check manufacturer instructions—some are removable and machine washable
- If not removable, use a lint roller to pick up debris, then spot clean with a damp cloth and mild soap
- Allow to fully air dry
Cleaning the Headband
The headband accumulates oils from your hair and skin. Wipe it down weekly with a damp cloth (water or alcohol). For leather headbands, you can use a tiny amount of leather conditioner afterward to prevent cracking.
Cleaning the Driver Grilles
The outer grilles on over-ear headphones can collect dust and skin cells. Use your soft brush gently, then wipe with a dry or lightly damp microfiber cloth. Avoid pushing debris into the driver openings.
Deep Cleaning: When Regular Cleaning Isn’t Enough
If you’ve neglected cleaning for months (or years), you’ll need a more intensive approach. Here’s how to handle heavy buildup.
Heavy Ear Tip Buildup
When earwax has hardened into a waxy crust:
- Soak tips in warm soasty water for 10-15 minutes (longer than usual)
- Use a soft brush while soaking to break up the buildup
- For stubborn spots, use a wooden toothpick very gently—don’t puncture the silicone
- Rinse thoroughly and dry completely
If tips are too damaged or stained (sometimes the wax actually changes the color), consider replacing them. Most earbuds have replacement tips available for $10-20.
Grille Clog Deep Clean
If brushing doesn’t restore full sound and you suspect the grille is still clogged:
- Use compressed air in short bursts
- Angle the earbud so debris blows out, not deeper in
- Follow with a dry brush
- Finish with an alcohol wipe around the outer edge of the grille
Important: Don’t overdo compressed air—excessive pressure can damage the driver membrane.
Removing Sticky Residue
If your earbuds have become sticky from skin oils or hair products:
- Mix a solution of 50% water, 50% isopropyl alcohol
- Dampen a cloth (not dripping) and wipe the sticky areas
- Follow immediately with a dry cloth
- Repeat if necessary
The alcohol evaporates quickly, taking the sticky residue with it.
Common Mistakes to Avoid
Using Too Much Liquid
The biggest error is over-wetting your cleaning tools. Your earbuds contain sensitive electronics—a few drops of liquid inside can cause permanent damage. Always wring out cloths until almost dry, and never dip earbuds themselves in water. Only the removable ear tips should be submerged.
Using Harsh Chemicals
Avoid these cleaning agents:
- Acetone or nail polish remover: Will melt plastic
- Bleach or hydrogen peroxide: Can discolor and damage materials
- Glass cleaners (like Windex): Contains ammonia that can damage coatings
- High-percentage isopropyl alcohol (90%+): Can dry out and crack rubber components
Stick with mild soap and water, or 70% or lower isopropyl alcohol.
Using Abrasive Materials
Never use paper towels, rough sponges, or scouring pads. These can:
- Scratch glossy surfaces
- Leave fibers that attract more debris
- Damage mesh grilles
Only use soft brushes and microfiber cloths.
Cleaning While Powered On
Always clean with power off. This prevents accidental button presses and eliminates any electrical risk. It’s also easier to see debris when you’re not trying to use them.
Forgetting to Clean the Case
Your charging case can become a reservoir for bacteria and debris. Wipe it out weekly with a dry or lightly damp cloth. Use a dry cotton swab for the charging ports. Don’t use liquids inside the case.
How to Prevent Earwax Buildup
An ounce of prevention…
Clean weekly, not just when needed. Five minutes once a week keeps buildup from becoming a problem. Once earwax hardens, removal takes much more effort.
Rotate your ear tips. If you use earbuds for many hours daily, keep two pairs of tips and alternate them. This gives each pair time to dry completely between uses, preventing bacterial growth.
Use ear tips that fit properly. Loose tips cause more skin contact and oil transfer. They also let in more ambient noise, leading you to turn up volume higher—which can cause more earwax production.
Consider earwax removal first. If your ears produce excessive earwax, consider using over-the-counter earwax removal drops or seeing a doctor. Cleaner ears mean cleaner earbuds.
Store properly. When not in use, keep earbuds in their case. This protects them from dust and debris. Don’t leave them on desks or nightstands where they collect dust.
Frequently Asked Questions
Q: Can I use hydrogen peroxide to clean earwax off headphones?
No, hydrogen peroxide can damage the materials and coatings on your headphones. It may cause discoloration and can weaken rubber components. Stick with mild soap and water for ear tips, and 70% or lower isopropyl alcohol for hard surfaces.
Q: How do I clean Apple AirPods Pro ear tips?
Remove the tips by pushing them firmly until they click out. Soak them in warm soapy water for 5 minutes, rinse thoroughly, and air dry for at least 30 minutes. Clean the AirPods themselves with a dry soft brush for the grille, then wipe with a lightly dampened microfiber cloth. Avoid getting moisture in any openings.
Q: Will cleaning my earbuds improve sound quality?
Yes, removing earwax and debris from speaker drivers can restore clarity, especially in higher frequencies. If your earbuds sound muffled or quieter than before, cleaning is often the fix. Don’t expect miracles from heavily used drivers, but you’ll likely notice improvement.
Q: Can I use wet wipes on my headphones?
Generally no. Most commercial wet wipes contain chemicals, fragrances, and moisture levels that can damage electronics or leave residue. If you must use something pre-moistened, look for electronics-specific cleaning wipes, but even these should be used sparingly and never on open speaker areas.
Q: How often should I replace my ear tips?
Replace ear tips when they show signs of wear: cracks, tears, permanent discoloration, or loss of shape. With daily use, silicone tips typically last 3-6 months. Memory foam tips may degrade faster. Replacement tips cost $10-20 for a multi-pack.
Q: Is it safe to use compressed air on earbuds?
Yes, but use caution. Short bursts from a distance of 2-3 inches work best. Hold the earbud so debris blows away from the speaker opening, not into it. Don’t overuse—excessive pressure can damage the delicate driver membrane.
Conclusion
Cleaning earwax from headphones isn’t complicated, but it does require the right approach and consistent habits. The most important points to remember:
- Clean weekly to prevent buildup from becoming permanent
- Keep liquids away from electronics—only submerge removable ear tips
- Use the right tools: soft brush, microfiber cloth, 70% isopropyl alcohol
- Don’t forget the case and charging contacts
- Replace worn tips when they show signs of age
Your headphones are an investment. A few minutes of weekly maintenance keeps them sounding their best, lasting longer, and staying hygienic. The payoff is clearer audio, better hygiene, and avoiding the frustration of degraded performance.
Start with a quick brush-out today—it takes 60 seconds and makes a difference. Your ears (and your music) will thank you.


Leave a comment